Last Updated on June 1, 2021 by Ava
There’s a lot of scenarios where you can use the information I’m about to share with you.
- Perhaps you bought a secondhand computer
- Maybe you flip computers for profit
- You forgot your own password
- Your mother, brother, sister, cousin, friend, dad, forgot their password
- Ad infinitum
I’m going to show you how to unlock your computer without a password in Windows 10 free. That’s right, it’s not going to cost you anything and it’s a procedure you can use over and over again.
Disclaimer: I am providing this information for educational purposes only. I am not seeking to educate those with nefarious intentions. The free sharing of information unfortunately means with everyone. If you’re using this for nefarious purposes, you’re a dirtbag.
What you’ll need to unlock your computer without password Windows 10
- A Windows 10 computer that is password locked
- A DVD or CD rewritable media or USB stick with a fresh install of Windows 10 (No, we are not reinstalling Windows; also, this is free)
- This article or the video below
NOTE: This method will NOT erase any data on your computer if you follow these steps exactly. By continuing, you agree that neither Ava nor heyyoava.com are responsible for your mistakes. You are proceeding at your own risk.
Step 1 – Create your Windows 10 Installation Media
NOTE: The video below does not include this step.
Go to – https://www.microsoft.com/en-us/software-download/windows10
Scroll down the page, and click the Download tool now button.
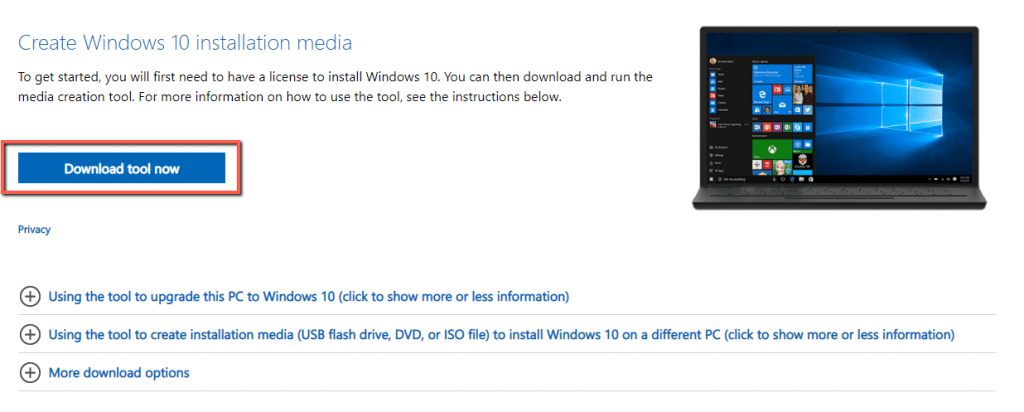
Accept the terms if you feel inclined and want to use the tool. 😋
Click the radio button next to Create installation media (USB flash drive, DVD, or ISO file) for another PC. This is very important! If you run it on Upgrade this PC now, it will upgrade the PC you’re using to create the media and you probably don’t want that to happen. 😲
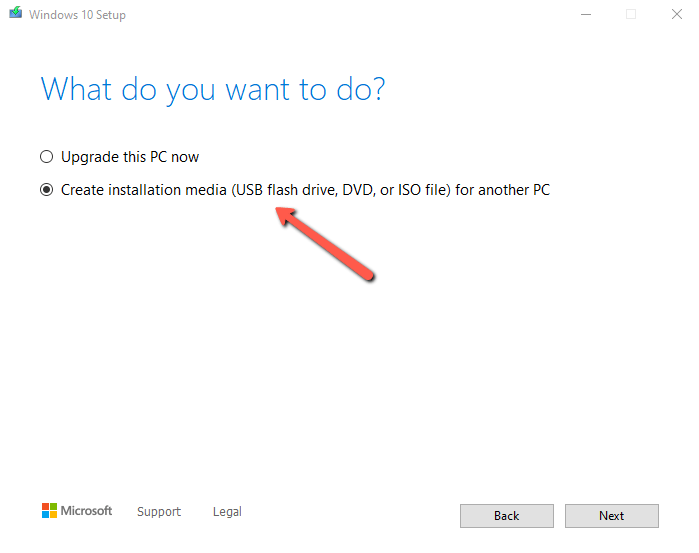
Click Next.
On the next screen, make your desired selections about language, etc. The defaults were fine for me.
Click Next.
Now you have a choice to make. Depending upon the media you’re using, select accordingly:
- For USB stick – click the radio button next to USB flash drive
- For DVD or CD-ROM – click the radio button next to ISO file
If you choose the ISO file, you’ll have an extra step in burning the file to your DVD or CD disc.
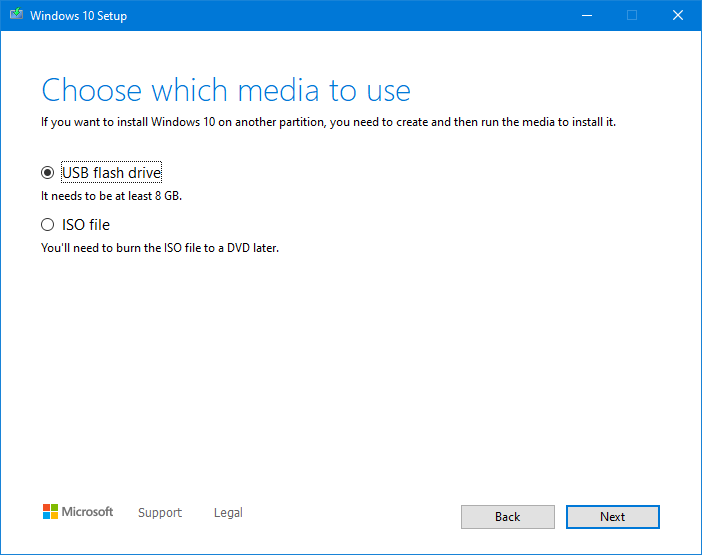
Click Next.
Select your drive from the list.
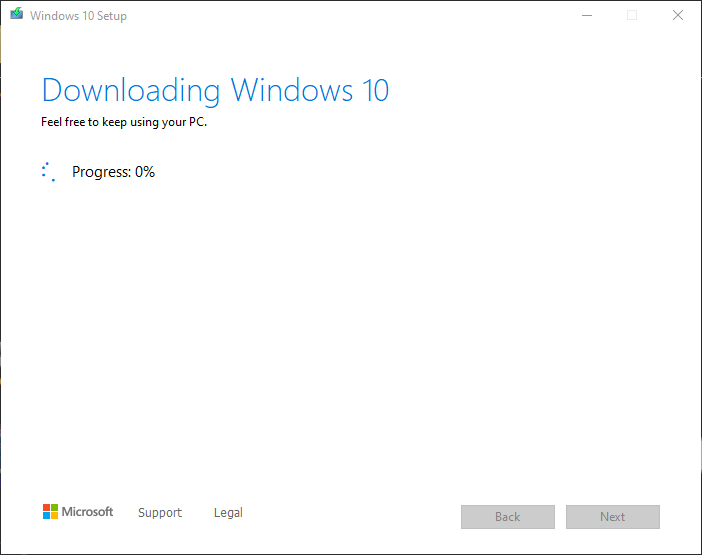
Once you click Next, the program immediately begins preparing your installation media, so be sure that’s what you want to do. Any files on your USB stick will be erased.
Creating the installation media takes several minutes depending upon the speed of your computer. For me, it was 45 minutes to an hour. I walked away and let it work.
When it’s done, click Finish, remove the media from your computer and insert it into your locked Windows 10 computer.
BIOS – Booting the Locked Computer to Your Media
For screenshots of this section, watch the video below.
This procedure isn’t for the faint of heart, we’re going to be going into the BIOS, and later on, we’ll be doing some heavy lifting with the Command Prompt, so get ready.
Don’t worry, if you follow the steps exactly, you will be golden. You can do it!
If the computer you’re trying to unlock has a BIOS password, you’ll need to follow these steps – https://youtu.be/0lxwvCu8XJc
You need to find out what keyboard shortcut gets you into the BIOS per the manufacturer of the locked computer. Here’s a list that should have you covered – https://www.tomshardware.com/reviews/bios-keys-to-access-your-firmware,5732.html
Turn on the locked PC, press, and hold whatever key combo you need to get into the BIOS while it’s booting.
Once you’re in the BIOS, you want to access the Boot section and look for where the boot order is listed.
The list should begin with Windows Boot Manager.
Arrow down to the list and highlight your drive: either USB or the DVD/CDROM.
Use F5/F6 to move it to the top of the list. F6 moved it up for me.
Press F10 to Save and Exit.
The computer will now boot to your media.
Gaining Access to the Locked Windows 10 Computer
For screenshots of this section, watch the video below.
Once the locked computer has booted to your installation media, click Next on the first screen with the language, etc.
On the next screen, pay attention, click Repair your computer in the lower-left corner. DO NOT click Install now. This will erase everything on the locked computer.
Click Troubleshoot.
Click Advanced Options.
Click Command Prompt.
In the command prompt, type C:\
Press Enter.
The prompt will open the C drive for you which is the main drive for most PCs by default.
You don’t see anything on the screen, but the command prompt will now read:
C:\>
There will be a blinking cursor next to that where you can input your next command.
Type CD WINDOWS\SYSTEM32
Press Enter.
The prompt will now read:
C:\System32>
There will be a blinking cursor next to that where you can input your next command.
Type COPY UTILMAN.EXE C:\
Press Enter.
The computer will make a copy of that file and display the following prompt again:
C:\System32>
Type COPY CMD.EXE UTILMAN.EXE
Press Enter.
The computer will make the cmd file into the utilman file, so when you click on the Ease of Access on the startup screen later on, you get an Admin level command prompt. You will then use this window to create a new user and make that user an Administrator of the locked computer.
Type exit.
Click Continue to boot the computer.
Remove your DVD/CD or USB drive. We are finished with it.
Click the screen like you’re going to log in and click the Ease of Access icon in the lower right corner.

This will open a command prompt window. This is an Admin level command prompt.
You’ll see this:
C:\WINDOWS\System32>
Type NET USER
Press Enter.
This will show a list of the accounts on the locked computer.
Type NET USER Owner 123456 /ADD
NOTE: You can replace Owner with a different desired username and 123456 with your desired password.
Press Enter.
You should see:
The command completed successfully.
C:\WINDOWS\System 32>
If you repeat the net user command, you’ll now see the new account you created in the list.
NOTE: You may also see an error message that says “The command completed with one or more errors.” You can ignore it.
Now we need to add the new user you created as an Administrator.
Type NET LOCALGROUP ADMINISTRATORS OWNER \ADD
Press Enter.
You should see:
The command completed successfully.
C:\WINDOWS\System32>
When you type NET LOCALGROUP ADMINISTRATORS and press Enter, you should see your new account in the list.
You can now log in to the locked computer with this account.
Type exit.
Press Enter.
Click Restart.
Click the username of your new account in the lower-left corner and type your password to log into your new Administrator account.
Windows 10 will go through the normal set-up procedure for a new user.
Access Accounts for Other Users
Navigate to the Users folder in Windows by double-clicking the C drive in File Explorer under This PC.
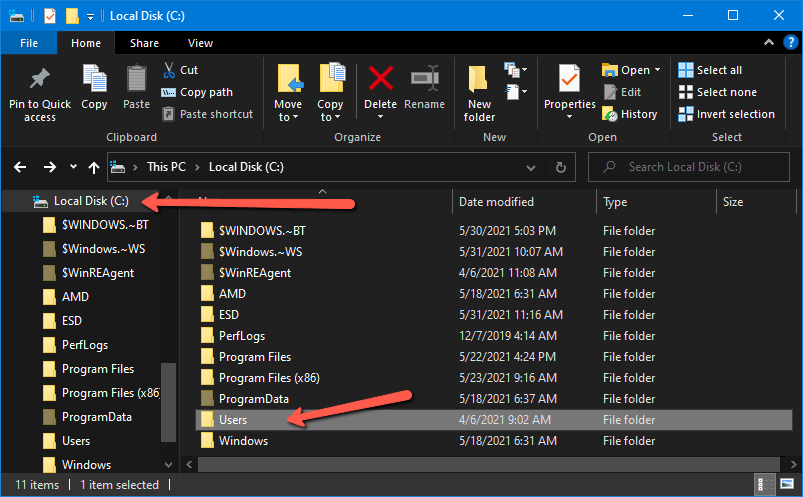
Double-click any user inside the folder and you’ll get an error message telling you that you don’t have permission to access the folder. Click Continue and wait for it to load. Depending upon the number of files, this could take several minutes or even a couple of hours. The users data will load and you’ll be able to view all of the folders and files.
Here’s a video from a guy a lot smarter than me who helped me learn this procedure and solve a problem. If you found this helpful, give him a like and maybe a subscribe.
If you found out how to unlock computer without password Windows 10 with this article, I’d love to hear from you!
Drop a comment below if you have time and be sure to check out the other problems I’ve solved for myself and then documented to help you solve them as well – https://heyyoava.com/category/i-solve-problems/

